Pickling 101
These Ain’t Your Grandma’s Pickles

Vats of boiling water, sterilizing instruments, enough salt to solidify the Gulf … not so long ago, pickling was the stuff nightmares were made of. But times have changed, ladies and gentlemen, and after an afternoon with local chef and health food educator Jill Welch, aka the Kitchen Goddess, fearing the DIY pickle has never felt more wrong.
With a touch of salt, a pinch or two of dried herbs and a splash of water, Welch has been showing Emerald Coast residents how to get the most out of their vegetables’ nutrition without sacrificing their time or taste buds in the process. How so? By utilizing the “live fermentation” method of pickling, you can ditch the cauldron for a well-salted mixing bowl full of water, your veggie(s) of choice and flavor enhancers like mustard seed, garlic, dill and sage. In the end, you’ll get that same great crispy crunch you love without all the hands-on time of traditional pickling.
The secret to this fast, easy and nutrient-rich method is in the vegetables. Leaving the traditional scalding method of yesteryear behind allows vegetables to remain raw, with all of their nutrients intact. In this process, the vegetables are required to produce their own “preservatives,” so to speak — a task that relies almost solely on the production of good bacteria.
The idea behind pickling with “good bacteria” is the same theory involved in the growing health food obsession of probiotic yogurt. The term “probiotic,” meaning “for life,” refers to living organisms in the food itself that may result in health benefits, including a more regular digestive system, when eaten in adequate amounts.
“We know about the health benefits of yogurt,” said Welch. “It has acidophilus and the beneficial bacteria that’s good for your gut. Well, this is the same idea. You’re putting beneficial bacteria that’s good for your digestion and the assimilation of nutrients into your system.”
What seems to be a revolutionary way of thinking in the world of pickling isn’t such a new concept, after all. According to the Kitchen Goddess, live fermentation is one of the oldest methods of preserving fresh vegetables. Before the days of refrigeration, people would store and preserve their garden treasures in much the same way. Change came to the art of pickling, however, when supermarkets started to emerge. Leaving the vegetables in their natural, living state resulted in jars often bubbling over, creating quite the mess for mankind’s first grocery store clerk.
Here, we’re not afraid of a little mess. And you shouldn’t be either. It’s as easy as 1, 2, pickles.
Step 1: Produce
The truth is, you can pickle just about anything. If you’re one of the Emerald Coast’s many garden gurus, we’re quickly approaching that special time of year where the fruits (or vegetables, as the case may be) of your labor are finally about to emerge. Pickling could be the perfect way to enjoy your hard work for months to come.
For those without a green thumb, there’s no need for concern. This time of year there are plenty of local vegetable stands and grocery stores bursting at the seams with fresh produce, giving you the pick of the crop when it comes to the selection process. Literally.
If you don’t usually buy organic, consider taking a word of advice from the Kitchen Goddess and give it a whirl. “If you’re going to buy organic at any time it should be when pickling and preserving,” said Welch.
The reason for making the switch is simple. Since this method of pickling is as much about enhancing as it is preserving, starting from a higher vantage point with organic produce is the first logical step.
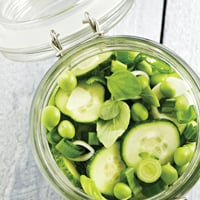
When pickling, consider using vegetables other than cucumbers, such as okra, carrots or sugar snap peas.
Step 2: Prep
Wash, slice and dice vegetables to your preferred size and texture — think chips or spears. If your vegetables are store bought, be sure to remove any waxy skin or residue. Once you’re satisfied, place produce in wide-mouth jar. Fill completely with salted water and selected seasonings. Instead of regular table salt, try unrefined sea salt, like Celtic or Himalayan, which can be found at any organic or health food shop.
Don’t be afraid to get your clean hands a little messy. The bacteria necessary to make this project a success need to be introduced from the air and your hands to the vegtables, making a hands-on approach absolutely crucial.
After your goodies have been jarred, your seasonings dispersed and your water poured, seal the jar tightly with appropriate lid. Place the container in a bowl you won’t need for the next few days and set a dishtowel over the top, blocking any light. Set aside.
Don’t be surprised if your premature pickles get a little rowdy — it’s all part of the fun.
“It’s going to be alive,” said Welch. “It’ll get really bubbly and when you open it up some of the liquid is going to come out. And that’s okay.”
Step 3: Pickled
And, voila! In just three short days and with a little counter clean-up time later, you’ll be crunching and munching away on deliciously healthy, homemade pickles. Just remember, the longer you let them sit, the more pickled flavored they’ll become.