An Oven for All Reasons
A look at the traditional and versatile Dutch oven
There’s probably no other cooking vessel as widely used or adored as the durable and useful Dutch oven. It can be used for just about anything, from baking biscuits and cobbler to stewing, frying, roasting and boiling.

Lindy Allen Photography
In its traditional form, a Dutch oven is a simple cast iron cooking pot with a tight-fitting lid. Originally manufactured in Europe and then England, the “Dutch” oven emigrated to America in the early 18th century. The heavy iron pot was heated evenly by placing it on coals and by putting coals on the lid. The original pot had a flat bottom and a smooth lid, but it evolved once it arrived in colonial America. A flange, or lip, was added to the edge of the lid to prevent coals from falling off, and “feet” were added to raise the bottom of the pot above the coals beneath. This prevented food from burning and sticking to the metal, although a metal stand or a raised insert like a trivet could be used in footless versions to accomplish the same thing.
As the years went by, the Dutch oven moved west with the young country. It traveled with pioneers and settlers and found a home on the range with chuck wagons on many a long cattle drive. Dutch ovens were built to last and were often a valuable part of one’s estate. Their sheer versatility led to the form’s longevity, and today it remains a popular piece of cookware. Cast iron models still abound and can be found simmering over campfire coals at cookouts across the nation. Meanwhile, aluminum and ceramic versions have found a home in the modern kitchen, although footless cast iron models can be used in modern ovens as well.
Cooking with a cast iron Dutch oven begins with seasoning the metal. Seasoning prevents rust and creates a non-stick surface. Wash, rinse and dry the vessel and give the interior a light coat of solid shortening like Crisco. Then it has to be baked in a conventional oven at 300 degrees for about an hour. You’ll want to open the windows for this part of the process because it will smoke up the kitchen. Once the vessel has cooled, wipe away any excess grease. To store, place a paper towel inside with edges hanging from underneath the lid. This helps remove oil and allows for airflow, which prevents any disagreeable smells from settling in.
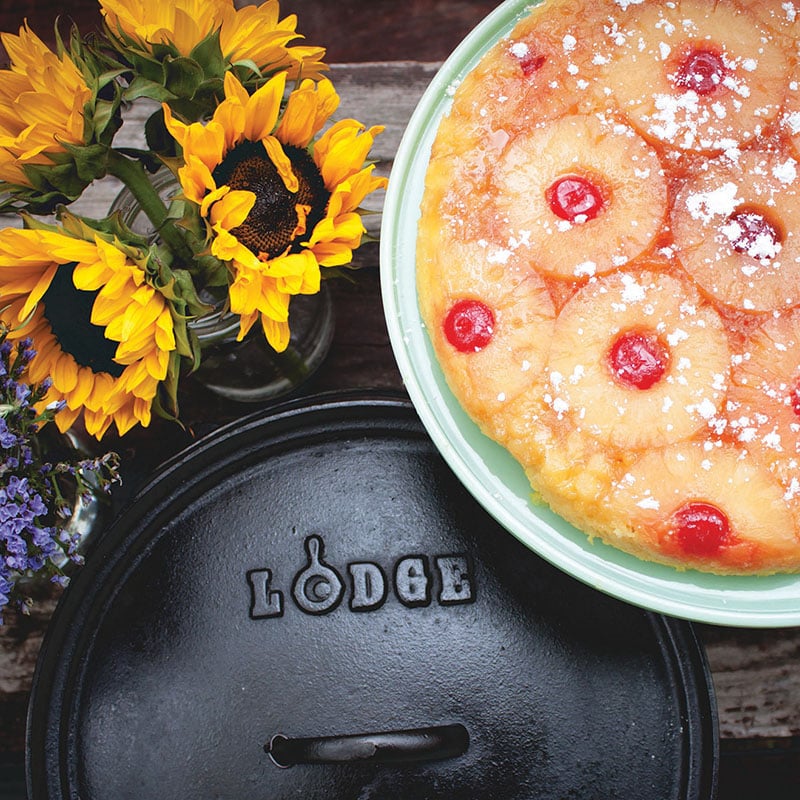
Pineapple Upside-down Cake
Serves 8–10
Requires 12” Dutch oven
Ingredients:
- 20 oz. can pineapple rings, drained(reserve juice)
- ¾ cup pineapple tidbits, drained (reserve juice from 20 oz. can)
- 1 small bottle maraschino cherries (about 20 cherries)
- 1 yellow cake mix
- 3 eggs (or amount indicated on cake mix box)
- ½ cup canola oil (or amount indicated on cake mix box)
- ¾ cup brown sugar, packed
- Spray-on canola oil
- Heavy duty aluminum foil (wide)
Preparation:
Line Dutch oven with foil (promotes even cooking and prevents brown sugar from sticking). Spray canola oil on bottom and sides of oven. Sprinkle brown sugar in even layer over bottom of oven. Arrange pineapple rings on top of brown sugar, working from center of oven outward (can use ring segments). Place one cherry in center of each ring. Prepare cake mix according to box directions, using reserved pineapple juice in place of required water. Add pineapple tidbits to cake batter. Pour batter over pineapple rings. Cover Dutch oven with lid and bake.
Baking Directions:
Cook 30–40 minutes or until knife inserted into cake comes out clean.
Using charcoal briquettes: Place 10 coals beneath oven and 14 coals on lid.
Using wood coals: Use low coals, 14 beneath oven and 20 on lid.